How to Make a PCB with AI
Until recently, making a printed circuit board meant learning schematic capture, footprints, placement, routing and manufacturing rules — weeks of practice before your first working board. AI changes the order of things: you say what the board should do, and the software works out how. This guide shows the whole process step by step, with a real board designed this way, and is honest about where a human should still look.
Watch it first (4:30)
The fastest way to understand it is to see it. This video follows one board from a single sentence to factory files:
How to make a PCB with AI, step by step
Decide what the board must do
Before you type anything, answer four questions: how is it powered (USB-C, a battery, 12 V?), what is the brain (an ESP32, an RP2040… or “you choose”), what does it connect to (sensors, motors, a screen, LEDs, buttons) and how big can it be. That is all the AI really needs. Our guide on how to describe a PCB to an AI has examples you can copy.
Describe it in plain words
Write it the way you would explain it to a friend: “A mini drone with an ESP32”, or “A weather station with a temperature and humidity sensor, a small screen and USB-C, 50 × 50 mm”. You don't need part numbers or electronics vocabulary — if something essential is missing, the AI asks.
Let the AI work — hands off
This is the part people get wrong: once you have described the board, don't keep adding messages unless the AI asks you something. It is already working through a long checklist — choosing parts that are really in stock, wiring every pin, adding decoupling capacitors and protection, placing and routing — and it keeps reviewing its own work, so if something was missing from your description it adds it later on its own. Interrupting only slows it down.
Watch the schematic, board and 3D appear
You can follow the design live: the schematic grows block by block, the board is placed and routed in front of you, and a 3D model shows the finished board with every component. You can also switch the schematic to a fully wired view, move parts with your mouse, or ask for changes in the chat (“move the USB connector to the left edge”).
Check the verification results
A board that looks good can still be wrong, so the results of the checks matter more than the pictures: the electrical rule check (ERC) must have zero errors, the design rule check (DRC) zero violations and zero unconnected nets, track widths must match the real currents, and a final review confirms every part sits inside the board without overlaps. BuildPCB runs all of these automatically and won't call the board finished until they pass. The virtual bench also simulates the circuit's voltages so you can spot problems before ordering.
Download the files and order the board
The result is a zip with Gerber and drill files, a bill of materials with real part numbers, a pick-and-place file for assembly, a schematic PDF and a 3D model. Upload it to JLCPCB, PCBWay or any other fab, and the boards arrive at your door. Not sure what each file is? See Gerber, BOM and pick-and-place files explained.
A real example: a quadcopter flight board
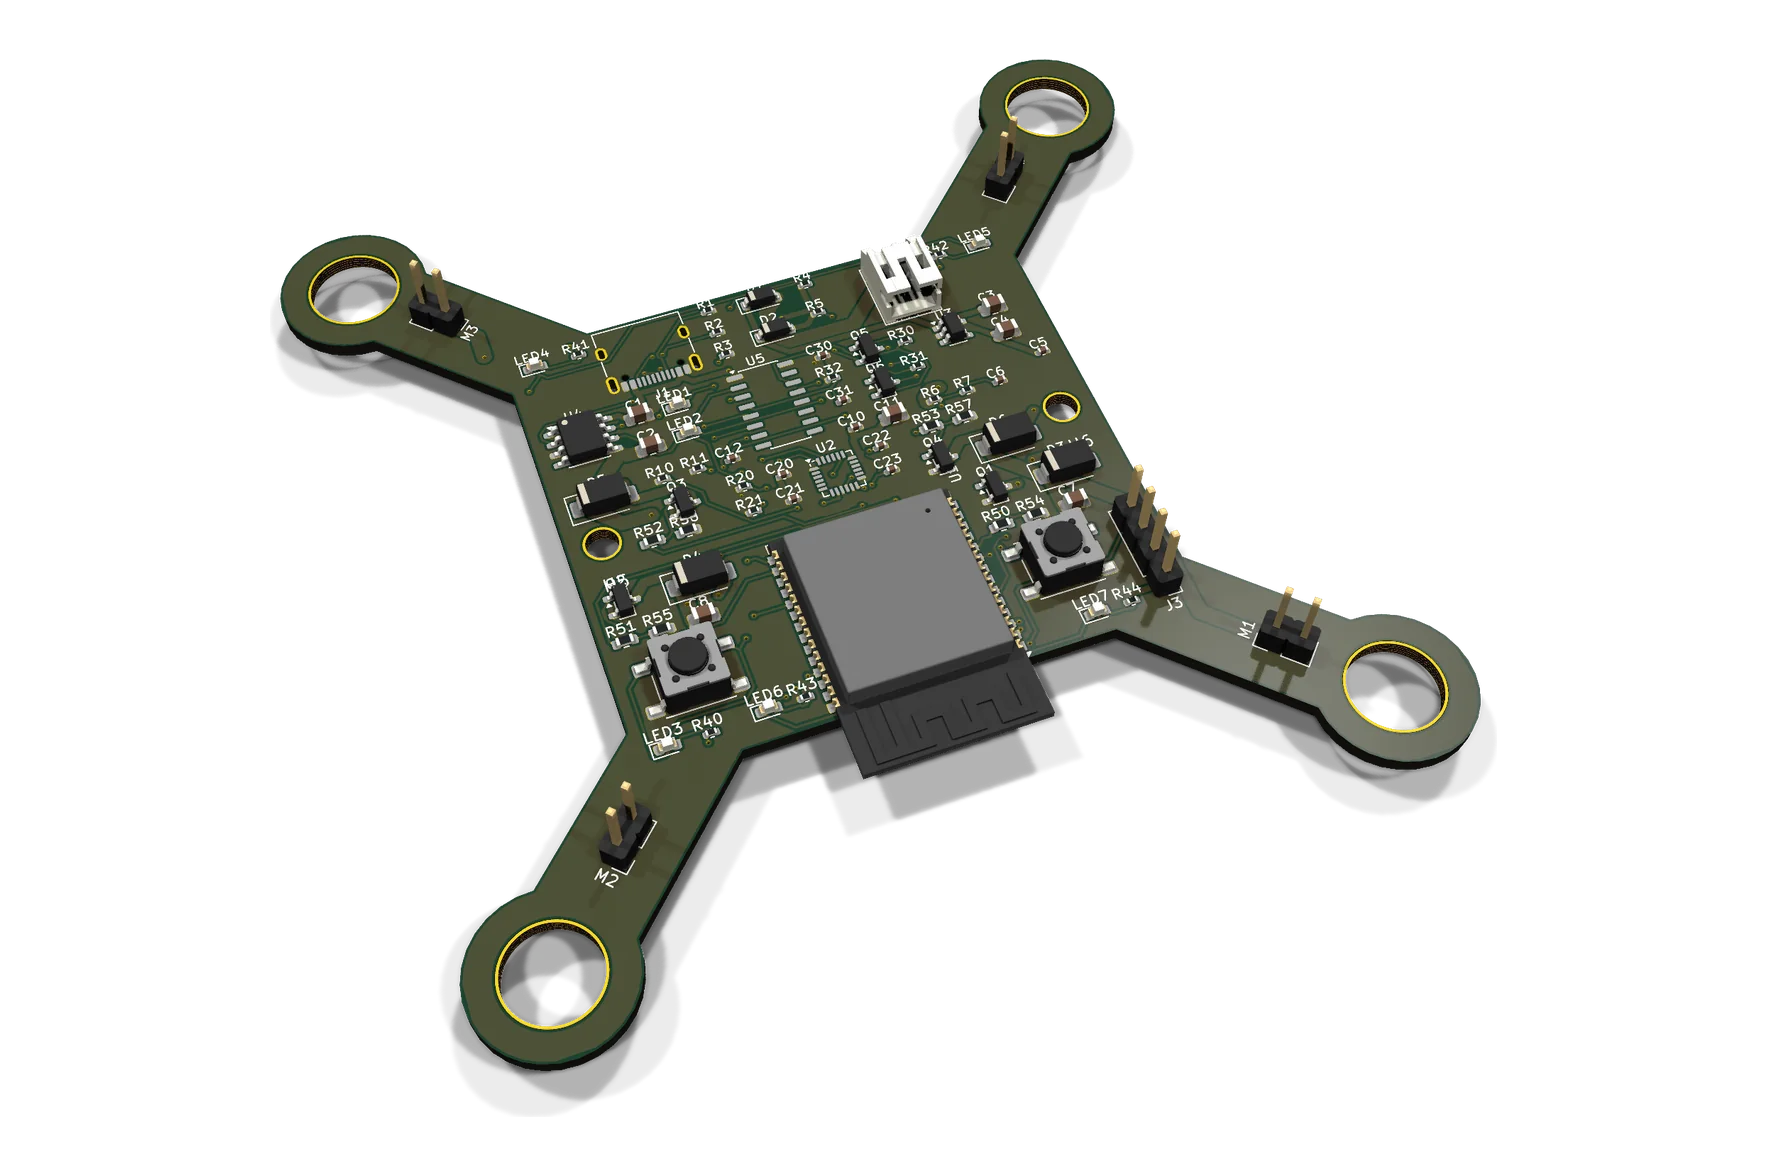
This quadcopter board was designed in the BuildPCB studio: the engine chose the motion sensor, the motor drivers, the battery charger and the USB-C programming circuit, drew the schematic, and placed and routed the board. You can see it and other boards — a GPS tracker, a digital camera, a GSM phone, an LED matrix — in the real boards gallery. As with any design, run the final checks and review it before you send it to a factory.
Three ways to use AI for PCB design
| Approach | What you do | What you get | Good for |
|---|---|---|---|
| Ask a general AI chatbot | Ask questions, paste errors | Explanations and advice, no files | Learning, debugging ideas |
| AI assistant inside PCB software (e.g. plugins and MCP servers for KiCad) | You still drive the CAD tool and know the basics | Help with steps you already understand | Engineers and experienced hobbyists |
| End-to-end AI PCB design (BuildPCB) | Describe the board in plain words | Schematic, routed board, 3D, checks and factory files | Makers, students, founders, anyone without CAD experience |
A general chatbot cannot give you a board you can manufacture: it can't check real stock, run DRC or export Gerbers. Plugins are powerful but assume you already know PCB design. If your goal is a physical board and you don't want to learn CAD first, an end-to-end tool is the shortest path. For a deeper look at what happens inside, read how AI actually designs a circuit board, or compare the main products in AI PCB design tools in 2026: an honest comparison.
Tips for a better result
- Say how it's powered and how big it can be. Those two facts change the design more than anything else.
- Name the must-haves, not the details. “A screen and three buttons” is better than guessing resistor values.
- Don't interrupt. Answer only when asked — the AI revisits the design and adds what's missing.
- Start small. A first board with one microcontroller and a few sensors is cheap to make and easy to check.
- Review before you order. Read the schematic summary and the bill of materials. For boards that touch mains power, vehicles or medical uses, have an engineer check it.
When you still need an engineer
AI handles most hobby and prototype boards well, but some designs need an expert's eye: high-speed interfaces (DDR, USB 3, HDMI), RF and antennas, anything connected to mains voltage, safety-critical products, and products that need FCC or CE certification. AI gets you to a reviewed prototype much faster; it does not replace certification. Designs are AI-generated — always review before manufacturing.
Frequently asked questions
Can AI really design a PCB?
Yes, for most small and medium boards: microcontroller boards, sensors, LED boards, chargers, controllers. An end-to-end tool like BuildPCB chooses the parts, draws the schematic, places and routes the board and runs ERC and DRC. High-speed, RF and mains-powered designs still need an engineer's review.
Do I need to know electronics to make a PCB with AI?
No. You describe what the board should do in plain words; the AI makes the technical decisions and explains them. Reviewing the result before you order it is always recommended.
How long does it take?
Usually from a few minutes for a tiny board to a couple of hours for a complex one. You don't need to watch it: the AI keeps working on its own.
What files do I get?
Gerber and drill files, a bill of materials with real part numbers, a pick-and-place (CPL) file, a schematic PDF and a 3D model — what any PCB manufacturer asks for.
Where do I get the board made?
Any PCB manufacturer: JLCPCB, PCBWay, Aisler, Eurocircuits or a local fab. You upload the zip and order.
Do I need to install anything?
No. BuildPCB runs in the web browser on a phone, tablet or computer. There is also an optional desktop app.
Is it free?
Creating an account and exploring a demo project is free. Designing your own boards needs a monthly plan, from $19 a month.
Make your first PCB with AI
Describe your board and watch it being designed — in your browser, on a phone, tablet or computer. Nothing to download.
Start with BuildPCB